Preparing your mixes for mastering
PART 1
1 “What file format do I need to supply for mastering?”
File Type: Whether your mixes are being mastered for streaming, CD or vinyl release, WAV files are the standard format to present at mastering. Due to their ‘uncompressed’ nature, WAV files are the ideal choice as they provide the highest audio quality.
Sample Rate: 44.1kHz through to 96kHz are all perfectly acceptable. When rendering your mix use the same sample rate as your project. Don’t upsample or downsample.
Bit Depth: Either 32 bit or 24 bit files are perfect to present for mastering. 32 bit is superior as it has additional headroom (meaning it has a less likely chance of clipping or distortion) and requires no dithering. 24 bit files will require dithering at both the mix and mastering stage. Is this double dithering process disastrous? Hardly. But if we can avoid it, why not? If possible avoid bouncing down at 16 bit, but it’s not the end of the world if that’s all you have.
Stereo or Mono files: Mixes should be ‘stereo interleaved’. There’s no need to supply separate Left & Right channels.
As a side note, it’s also useful to number your mixes so the mastering engineer is aware of the running order.
2 Listen carefully to your final bounces
This may sound like an obvious point to make, however faulty bounces are the number one reason for hiccups and delays at the mastering stage. Don’t assume that your 176 track mix is going to render perfectly every time. Always listen to your final mixes from the beginning to the end before sending it to mastering. Here is a short list of things to check;
- Make sure all tracks are playing correctly, and that there are no clicks, pops or mutes in the audio.
- Make sure sections with plug-in automation are behaving as intended
- Make sure sections with edits are free of clicks (use small crossfades to avoid clicks at the edit points)
- Make sure your fade in and fade outs have rendered smoothly
- Make sure you have selected the correct file type, bit depth and sample rate
3 “Should I limit or compress the stereo mix before mastering?”
Compression on individual channels is pretty much essential in modern music production, however if you’re just starting out in the world of mixing, I would suggest going easy on your master bus processing. Of course some compression is fine if it’s adding a pleasing aesthetic, but if it’s just there for the sake of level, I’d recommend taking it off. Brick-wall limiters or any kind of clipping should certainly be switched off before rendering your final bounce. Don’t be concerned if your mixes are not peaking at zero or if they sound quieter than reference tracks you may be listening to. Your mastering engineer will no doubt have access to some of the world’s best compressors on hand, so they will take care of the final volume at the appropriate stage during mastering. If you’ve been mixing into compression and feel it has become an integral part of the mix, it’s best to send 2 prints of the final mix. One with and without the master bus compression.
Even though we can never judge a mix based on how it looks, below is a typical example of what appears to be a healthy looking mix to present for mastering. Plenty of headroom for equalisation and other processing at the mastering stage.

The waveform below is an example of a mix with little to no headroom. Not an ideal mix to be presenting the mastering engineer with.
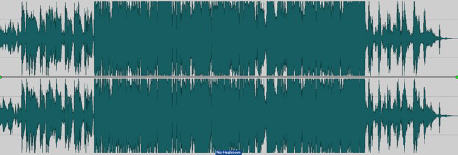
Mixes like the one above can present several pitfalls at the mastering stage;
- The sheer lack of headroom simply means that the mastering engineer cannot work as effectively on the mix.
- If a mix needs equalisation, this often sounds best ‘before’ not after compression. Applying another stage of compression after the equalisation is not ideal as this will simply result in a master that is severely overcompressed.
- Compression can often work hand in hand with other mastering processes, so removing this option at mastering restricts creative choices.
- The mastering engineer could have a different idea of dynamic processing to the one you had. It could be a different style of compression, such as upward compression or a completely different method such as parallel compression. These options are removed if the mix is already compressed to the point where it can handle no more.
- If a mix has brickwall limiting but requires additional equalisation, this will result in ‘peaks’ being regenerated and therefore another stage of limiting is required. Not ideal at all.
4 False Headroom
Over the years I have been asked many times by producers this same question. “How much headroom would you like Joe?”. Generally I’ll reply, “5 or 6dB would be great!” I then receive mixes like that in Fig A.
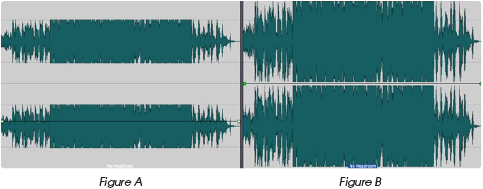
Try and aim for a mix that has at least 6dBs of headroom. What does that actually mean?? In practical terms, this means the mix is about 6dBs lower than where you’d expect it to be ‘after’ mastering. A LUFS reading around -16LUFS is a great volume to aim for in the final mix.
Also note that the ‘peak’ reading isn’t anywhere near as important as the average level. A mix can peak at -0.1dB but still have a very generous amount of headroom.
Please note, waveforms like that on the left (Fig A), do NOT contain headroom. This is ‘false headroom’. Regardless of how much you turn down the gain on a mix like this, a mix that has already been subject to over compression, clipping and brickwall limiting does not regain its dynamics by simply turning it down. The mix in Fig A has exactly the same amount of headroom as the one in Fig B.
Master Bus “Dos & Don’ts”
- Try to avoid applying any ‘brickwall limiting’ to your mixes. In my opinion, this type of signal processing is best done at the very last stage. Post EQ. Post compression. It also allows the mastering engineer to create great sounding vinyl masters.
- Try to avoid applying any ‘clipping’ to the mix before mastering. (For the same reasons as above)
- Avoid applying compression just for the sake of ‘making it louder’. Only apply compression if it is adding a positive and pleasing aesthetic to the mix.
- If possible, try to avoid applying the ‘final’ amount of compression on your mix. If you feel you want to keep the existing compression on your mix bus, perhaps try reducing it a little in order to give the mastering engineer some scope to apply a little more after they’ve applied EQ.
- Don’t second guess what the mastering stage will do to your mix and attempt to compensate. This will most certainly skew your mix in the wrong direction and further confuse your mastering engineer. A good mastering engineer should be able to take your mix as is, and enhance it without adversely changing the intention and direction of your mix. I’ll give an example of this. Over the years I have had many good producers tell me that their previous mastering engineer requested that they present their mixes with an exaggerated kick or vocal level. This was to compensate for the compression applied at the mastering stage. Be aware that this is not best practice. A mix engineer should never alter their mix to suit the mastering engineer’s workflow.
- Do supply an alternate, ‘uncompressed’ mix to the mastering engineer so they have the option of applying compression at a later stage. Accompany this with any details of the compression you applied (e.g. SSL style, Attack time, Release time, Ratio etc). In this way the mastering engineer retains the option to faithfully re-create the compression that you originally applied, but at a later stage in the mastering process.
- Do supply the engineer with any ‘reference’ master you’ve created for the artist.
- Do compare your mix with & without compression, level matched! Hearing a slightly louder mix will always sound more engaging at first, but the true test is to lower the output of your compressor, so when bypassed, it is exactly the same volume without compression. This is the only true way to hear if the compressor is in fact acting positively on the mix.
- Do try and fix issues at the ‘multi-track’ level first before jumping on the master bus. For eg. If your mix feels like it has a lumpy and boomy bass response, treat the individual bass track/s rather than slapping a multiband compressor over the whole mix. Fixing the problem at the source is a much more effective and sophisticated way of treating the problem.
- Lastly, craft your mix like there was no master bus processing or mastering available. Make all efforts to get your mix sounding as ‘finished’ as possible, without any master bus processing. This ensures when mastering kicks in, your mixes will elevate beyond your expectation.
5 Tape Emulators
Whilst we are on the subject of compression, I’d also like to quickly talk about ‘Tape Emulators’. For all intents and purposes, these should also be considered as compressors. If you’re placing a traditional compressor across your mix bus, be wary about placing a tape emulator across it as well, as this can be doubling up on compression. In fact the compression applied by most tape emulators is actually pretty strong, so be sure your mix can handle it.
Also be acutely aware that once you engage a tape emulator, several other changes will take effect on your mix besides tape compression. An additional ‘bass boost’ will be instantly placed on your mix; often referred to as ‘head bump’. Does your mix need the extra bass? The different speeds you can select on the emulator will change the type of bass eq applied to your mix. The slower you go, the lower the frequency bump.
Tape Speeds
30 ips: At 30 ips (inches per second) the head bump affects the low mids, around 100 – 150 Hz. 30ips offers the most ‘open’ and transparent sound. It also preserves most of the transient response.
15 ips: At 15 ips the eq drops an octave and boosts the low end around 40 – 50 Hz. The resolution is also reduced resulting in an obvious dampening of the transients. You need to make a choice if you want some of the snap & punch taken out of your recording.
Slower speeds of 7.5 and 3.75 ips reduce the resolution significantly and there is a much greater roll off in the top end. These low speed options might be suited for some colouration on individual tracks, but I would suggest they are not suitable for master bus processing.
The following graph shows the typical bass response changes when using a tape machine. The red curve displays the eq shift at 30 ips and the blue curve represents the shift at 15 ips.
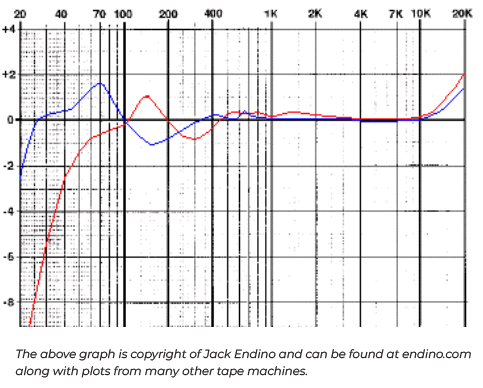
It’s important to note that each tape emulator will behave slightly differently as they are all based on various tape machines which all exhibited different characteristics. In general though, expect;
- around a 2 – 3dB boost in the bottom end.
- softening of transients (especially at 15ips and lower speeds)
- potential loss of top end (depending on speed, tape machine and even tape stock!)
- tape hiss! A lot of emulators will generate some kind of white noise to mimic tape hiss. In most cases this can be switched off.
As with all mix bus processing, it’s essential to compare the effects of tape emulators ‘level matched’ with the untreated signal, as most emulators will give an automatic boost in level, altering your perception of what is actually taking place. Once level matched, it’s a lot easier to audition the different speeds, tape stock and machine models to see if this kind of processor indeed suits your mix.
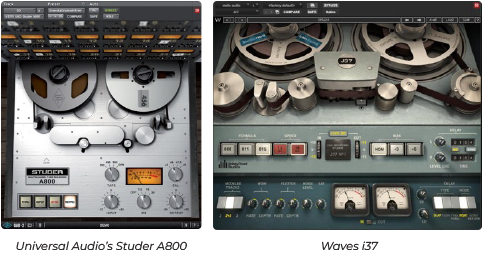
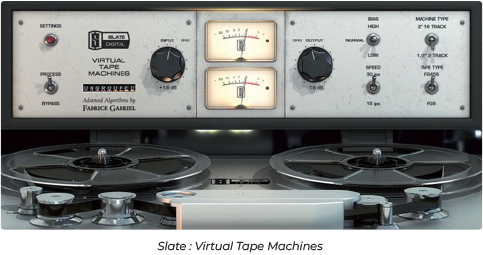
Pictured below are 3 examples of popular tape emulators.
6 “I’m selling my songs as Mp3s. Why can’t I supply Mp3s for mastering?”
Most likely, your music might eventually be streamed in some form of lossy format, but mastering from high resolution audio will always yield the highest quality of audio for your release. It’s important to note that streaming services such as Apple Music insist on 24 bit files, so they can re-encode your music from your high resolution files as they continually update their streaming codecs. It’s also important to be aware that in this day and age, many record labels & digital distributors are providing fans with the option to download HD (hi-definition) music, so with this in mind, providing 24 bit WAV files at the mastering stage would be an absolute minimum to aim for.
Even though this might seem logical, it’s an absolute ‘must’ to bring the full resolution wav file to mastering. Mp3s are simply not a professional nor desirable format to master from. MP3s use ‘lossy’ compression, which removes some audio data to reduce file size. This process introduces artefacts and simply degrades the sound quality. The mastering engineer can’t recover the lost data, leading to a compromised final master.
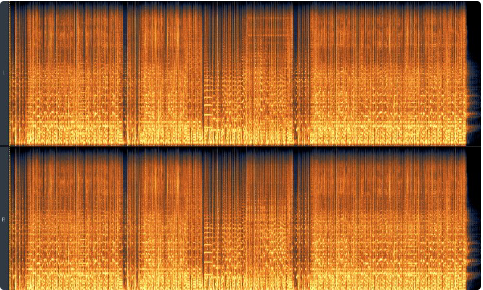
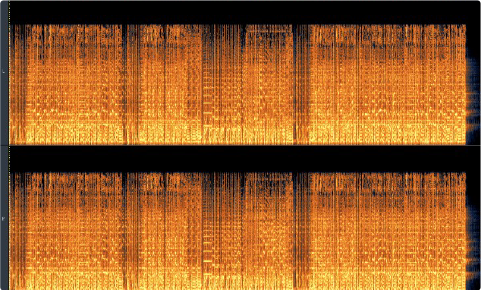
To highlight this issue further, the following are two ‘spectral’ views of the same waveform
A Spectrogram is like a 3D representation of audio. The image below shows a full resolution, 24 bit wav file. We can see the wav file has information extending all the way to the top of the spectrum.
Below, you can clearly see that the mp3 has a significant amount of data missing in the image. Not only are there small amounts of data missing throughout the whole waveform, but the very top of the waveform is chopped off. This would result in a mix lacking the detail and richness of the full resolution wav file.
7 “Should I listen to my mix outside the studio?”
Definitely! Don’t fall into the trap of only listening to your mixes in the studio. Play your mixes on a variety of systems to get a feel for how they sound in real world environments. This will give you a good indication of any obvious problems that are present in the mix.
Here’s why it matters, especially if you’re mixing in rooms without acoustic treatment and using budget-friendly speakers;
– The Reality of Home Studios: DIY recording artists often work in home studios, which aren’t acoustically treated. This means your room can introduce unintended sound colorations, reflections, echoes and most likely a very uneven frequency response. This can lead to mixing errors, ultimately resulting in an incorrectly balanced mix.
– Listening in the Wild: By testing your mixes in different places you’ll uncover issues that might have been masked in your home studio. Listening to a mix outside the studio can not only eveal imperfections in the mix, but can alert you to common mistakes you are making in your mix room and let you adapt and compensate for these issues.
– The Limitations of Budget Speakers: Many DIY artists work with budget-friendly speakers, which may not offer the most accurate representation of your music. These speakers often have their own unique sound characteristics or colorations. Listening in various places allows you to compensate for the coloration of your speakers. You’ll learn how to make adjustments to achieve a more balanced mix that translates well across different playback systems.
The Importance of a Fresh Perspective
Our ears quickly adapt to our environment. If you’ve been working in the same room with the same speakers for hours, your perception can become biased. Listening in various places can reset your perspective and help you catch issues you might have overlooked.
Embracing the practice of listening everywhere before submitting your mixes for mastering can make a world of difference. It empowers you to overcome the limitations of your recording environment, adapt to your budget-friendly speakers, and gain a fresh perspective on your music. Ultimately, it helps you create mixes that translate well on a variety of playback systems, ensuring that your music resonates with a wider audience.
8 “Do I need to attend the mastering session?”
Our mastering engineers are happy to work with or without artists attending. Approximately 90% of our work is done in unattended sessions, however we always welcome anyone who wants to sit in during the mastering. It’s easy to submit your mixes to us online. Simply go to our website and use the Dropbox on our ‘e-mastering page’. Alternatively if your mixes are already online, simply send us the download link to our email address; info@crystalmastering.com.au
If you have been using a particular reference track during the production of your release, it’s a great idea to also submit that and let the mastering engineer know the kind of sound you were trying to achieve throughout the production process. Generally links to Spotify and other streaming services are ok, but not ideal. I think it’s safe to say most mastering engineers would prefer a download of your reference track as it makes it so much easier to drop into their workstation and reference against.
9 “Do I really need to organise a listening session prior to my mastering booking?”
We generally hold listening sessions in house as it’s simply more efficient for us to do this task when we have some down time. Of course in person listening sessions are welcome if we have the time in our schedule. We recommend our engineers hear your mixes prior to mastering if:
It’s the first time you’ve recorded and produced an album
You’re not 100% happy with the mixes and unsure if the mastering process will be able to address certain issues
You’ve mixed the album in an environment you’re not usually accustomed to and just need some reassurance
If you’re an artist using an experienced audio engineer to produce your album, then I would assume your mixes are in great shape and there’s no need for a listening session prior to mastering. Of course if you have any concerns, then we’d still be happy to listen to the mixes beforehand.
10 Tips for mixing for vinyl
There are physical limits to what the head of a lathe can endure when cutting vinyl. Following are some general tips for mixes destined for vinyl;
- First and foremost, be sure to let your mastering engineer know if you intend to release vinyl. This will allow them to give you an additional set of masters that have been tweaked to ensure your vinyl will sound as good as possible. Even subtle tweaks made at this stage can have a large impact on the vinyl pressing. Using digital masters for vinyl pressing is far from ideal.
- Try and eliminate as much sibilance as possible on the vocal track (de-essing). Sibilance can result in ugly sounding distortions on the final record.
- Remove any brickwall limiting or clipping from your mix buss (let your mixes breathe and sound huge on vinyl)
- Consider how you want to split the tracks up for Side A & Side B. Try not to have the sides too uneven in terms of their durations. Send this track list to your mastering engineer so they know how to prepare the vinyl master. Your mastering engineer should be able to give you some advice on this issue if you’re unsure.
- Before making your record, be sure to get a ‘Test Pressing’ from the record plant. This is your last and only opportunity to check the quality of what will be produced and ensure everything is exactly the way you want it. Pressing vinyl is expensive; make sure everything is perfect before manufacturing. Most mastering engineers will also offer to check this test pressing for you if you do not have the means or confidence to check it yourself.
- Be aware, not alarmed, of panning ‘bass heavy’ instruments. If the bass is too wide, you can run the risk of creating super thin grooves, which lead to the possibility of the stylus ‘skipping’. Your bass certainly doesn’t have to be mono, however if panned too extreme, measures may have to be taken to reign it in a little. There are no hard and fast rules here, and the mastering engineer will use their experience to determine how wide the bass frequencies on your mix can be. This may also be a conversation that the mastering engineer has with cutting engineer, and it’s not unheard of to do a few ‘test cuts’ to get trouble records across the line.
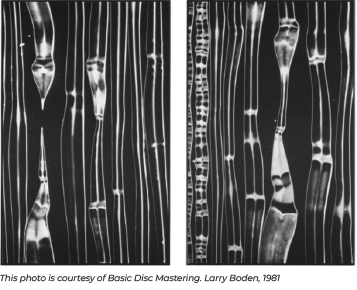
In the following examples, we can see the grooves of a record under the microscope. On the left hand side we can see a record with a bass response that is far too wide for a proper cut. It has caused the cutter head to lift out, thereby breaking the groove.
On the right hand side we can see the same piece of audio adjusted by the mastering engineer to avoid this problem
How To Check A ‘Test Pressing’
Turntable
Use a ‘decent’ turntable & stylus when checking a test pressing. The $50 suitcase style player is not what you want to go with.
Tone
Does the overall sound and tone of the test pressing closely resemble the master you sent to the plant? It should! For example, if your master was bright and had plenty of presence but your test pressing is dull and lacking clarity, then there’s reason for concern.
Skipping
Does the record skip? When playing the record does the audio suddenly jump and skip part of the song.
Pops & Clicks
Is there an extremely loud ‘pop’ or series of very loud clicks on the record? Rest assured your record will contain very small clicks throughout, that’s normal. However loud, distracting pops should be raised with the plant. This is possibly the most challenging part of checking a test pressing and no doubt drives pressing plants slightly insane as there can be a grey area about what is an acceptable click and what isn’t. At the end of the day don’t expect your record to sound like a CD, void of any surface noise. On the other hand you shouldn’t have to put up with abnormally loud clicks and pops.
Track Order
Are the tracks in the right order? Do the sides correspond to the track order? For example, does Side A contain the first half of the album and Side B contain the second half?
Bands
Are the ‘bands’ where they should be? If you look at a record, you will notice several ‘shiny’ circles on the disc. Otherwise known as ‘bands’. These denote where the new track starts. If you place the stylus on this band you should hear the start of the new track.
Surface Noise
The overall surface noise should be very low and not distracting. Anomalies to listen out for are loud ’swooshing’ type sounds that occur as the disc plays.
Volume
Is the record extremely quiet compared to other records you have? There could be a technical reason for this but it’s always best to raise this concern with the manufacturer. Also, are the volumes between sides similar or is one side much louder than the other?
It’s worth mentioning that your test pressing might be slightly quieter and have a touch more surface noise than your production run. This can be due to a couple of reasons;
– the presses may not have reached their optimal temperature when cutting just 2 or 3 records
– the quality of the vinyl may be different to that used on the final production run
It is essential that you receive at least 3 test pressings. This will make it easier to investigate defects on the master stamper. If for example a loud pop only exists on one record then it’s most likely that the stamper is ok. If this pop is in the same spot on all 3 test pressings then it is most likely the result of a defective stamper which will need to be re-cut.
Length
Remember to consider the overall length of your album. Will your 15 track album even fit on a record? Try and aim for about 18-22 minutes per side as this will yield a very high fidelity pressing. Even though technically speaking, a record can hold up to 26 minutes (depending on the type of program material), trying to cram too much material on a record can noticeably drop the audio quality.
Remember the golden rule of vinyl pressing; The longer the side, the lower the volume. This in turn means that the surface noise will increase proportionally, resulting in a noisier record.
If your album is too long to fit on a record there are 2 clear options;
- Drop a song or two off the record. (fans will still hear these tunes on your digital release)
- Press a double LP (expensive…but fun)
On the right, is a typical chart showing optimal cutting lengths as well as notes regarding how the levels change as the playing time increases.
Track Order
The track order of your album can also play a part in influencing the overall sound quality. As the stylus travels further into the record towards the centre, the quality is slightly compromised. This is simply because the inner grooves are travelling at a slower revolution than the outer grooves. (about half the speed).
This loss in resolution should be considered when deciding the track sequence. It is often desirable to place a less ‘active’ track at the end of a side. A soft interlude or ballad is the best choice, however this is not always possible.
PART 2
Two Common Mix Mistakes
The second part of this guide will cover a couple of the most common mix mistakes that I regularly come across in the mastering studio.
Tonal imbalance
Tonal imbalance is one of the hardest things to combat at the mastering stage. There are many examples of this imbalance, but I’m going to look at one of the most common scenarios. Sibilant vocal vs dull instruments. When a sibilant vocal is placed against dull instrumentation in a mix, it creates a complex challenge for the mastering engineer. The goal in mastering is to achieve a cohesive, polished final product, but this imbalance between bright vocals and dull instruments complicates the process.
Sibilance refers to the hissing sounds in vocal recordings, typically occurring on “s” and “sh” sounds. These can be excessively bright and piercing. Dull instrumentation, on the other hand, lacks high-frequency content, making the mix sound flat and lifeless. When these two extremes coexist in a mix, it presents a challenging problem for the mastering engineer. Brightening the mix to enhance the dull instruments will exacerbate the already overly bright sibilant vocals, leading to an unpleasant listening experience. Conversely, focusing solely on taming the sibilant vocals might result in the instrumentation becoming even duller and less clear. The mastering engineer must carefully balance the needs of both elements.
Uneven Bass
I am very often presented with a mix where the bass is too loud in some sections and then seemingly disappears in other parts. This results in a mix sounding somewhat disjointed and non cohesive. Bass frequencies often compete with other instruments, such as kick drums and low-end synths. If not properly managed during mixing, this competition can lead to some sections having an overly dominant bass while others lack impact.
This tonal imbalance can be further exacerbated by the acoustic characteristics of the production environment. If a mixing room does not have the appropriate acoustic treatment, it can mislead engineers about the actual bass levels. During the recording process, the room acoustics and mic placement can also lead to inconsistencies in the bass tone. Room modes in the recording space can cause certain bass notes to be twice as loud as others whilst other notes seem to almost cancel out.
Avoiding Common Mix Mistakes
The second part of this guide will cover a couple of the most common mix mistakes that I regularly come across in the mastering studio.
Quality Control
Experienced mastering engineers will develop skills and techniques to deal with these particular scenarios detailed above, however the best solution is to address them at the mix stage. As a mix engineer, I strongly encourage you to incorporate a Quality Control (QC) regime into your workflow. In my opinion, it will set you up for success and hold benefits for years to come. I know it has certainly worked for me. Ideally this QC check should be done with fresh ears on a day where you haven’t done any mixing on the album. QC checks should engage your ‘deep listening’ skills and be done in a distraction free environment.
At the end of this guide, I have included a ‘Quality Control’ sheet you are welcome to print out or use as inspiration to create your own. I have created it intentionally for new engineers just starting out. If you are able to tick off all the items on this QC sheet you can be confident that your mixes will have avoided some common pitfalls that trip up even the most experienced engineers.
FATAL ERROR: Checking this box ensures you have provided your client with mixes void of what some would call ‘rookie’ errors (such as clicks, mutes, mis-behaving plugins, bad edits, automation errors etc). This can only be done by listening to the mix from start to end. Headphones are a great option for this particular check.
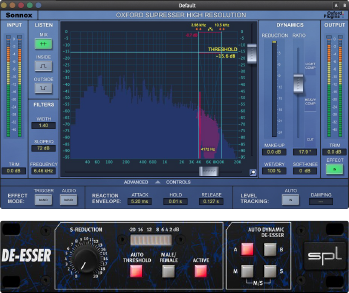
SIBILANCE: The mix engineer should focus their attention on how bright the vocal is compared to the other elements. Are the ‘s’ and ‘sh’ sounds harsh or overly loud? If the vocal is noticeably brighter and ‘sharper’ than the other instruments, employ a de-esser to try and balance this out. If there is any eq brightening the vocal, bypass it to see if that helps the vocal blend better with the other instruments.
Below are examples of 2 fantastic de-essers I have used and recommended to many colleagues over the years; The Sonnox ‘Suppressor’ and the SPL ‘De-Esser’.
Also be aware of sibilance at the tracking stage. If the vocals are sounding sibilant from the get go, try a different microphone. Get the vocalist to step off axis to the mic. Try recording from slightly further back. Any one of these steps could greatly reduce the issue.
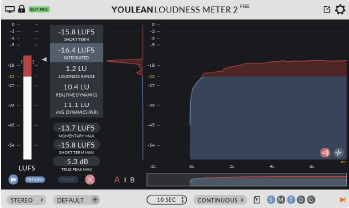
LUFS: Are you in danger of clipping or distorting the mix? Is it too hot for the final mastering process? Be sure to have some decent headroom left in the mix. Listen closely for any subtle distortion that you might have missed during the mixdown process. Look at the ‘integrated’ level reading on your meter, not ‘momentary’ or ‘short term’. Most level meters in recording software will have comprehensive meters to show you RMS levels or LUFS readings, but if yours doesn’t, there are plenty of free metering plug-ins that are extremely useful. The ‘Youlean Loudness Meter’ in the following picture, is a great example.
BASS RESPONSE: Listen to the consistency of the bass. Again, engage your ‘deep’ listening skills. Are certain notes flaring out? Are other phrases disappearing into the mix? See if some volume automation or compression can help even this out. Dynamic eq may be useful in this scenario. Other ways to mitigate this issue is to be aware of it from the tracking stage. If recording a bass amp, experiment where you place it in the room, all the while trying to achieve the most even tonal response. Having the right amount of ‘bass trapping’ in the recording and mixing room can also assist in producing a more even bass response.
Whilst we’re speaking of bass response, ensure that the rhythm section of your mix is working in perfect harmony. Is the bass guitar overwhelming the kick drum? Can you hear and feel the transient of the kick? If the punch of your kick drum isn’t cutting through the mix then try and re-balance your rhythm section. Can side-chain compression help your kick cut through better?
In time you won’t need a ‘formal’ QC sheet. As a professional engineer it will become a natural part of your workflow. However as a professional it is important to get these fundamentals right. Your clients will be demanding enough, so the less issues you present them with, the smoother the project will run. Avoiding pitfalls upfront will make you more efficient and lead to a more satisfying experience for both you and your client.
Joe Carra, Mastering Engineer

With over 30 years of experience in the mastering field, Joe Carra is the sole director and chief mastering engineer at Crystal Mastering. A Grammy nominated audio engineer, Joe is also a founding member of MPEG (Music Producer and Engineer’s Guild of Australia). Over the years, Joe has had the privilege of mastering numerous ARIA award-winning albums, and his work has amassed over 3.5 billion streams. Aside from his regular mastering duties, Joe can also be found giving guest lectures at various audio colleges in his area.
